| .github/ISSUE_TEMPLATE | ||
| build | ||
| client | ||
| images | ||
| server | ||
| .dockerignore | ||
| .gitignore | ||
| docker-compose.yml | ||
| docker-template.xml | ||
| Dockerfile | ||
| index.js | ||
| LICENSE | ||
| package-lock.json | ||
| package.json | ||
| prod.js | ||
| readme.md | ||
About
Audiobookshelf is a self-hosted audiobook server for managing and playing your audiobooks.
Features
- Fully open-source, including the android & iOS app (in beta)
- Stream all audiobook formats on the fly
- Multi-user support w/ custom permissions
- Keeps progress per user and syncs across devices
- Auto-detects library updates, no need to re-scan
- Upload audiobooks w/ bulk upload drag and drop folders
- Backup your metadata + automated daily backups
- Progressive Web App (PWA)
- Chromecast support on the web app
- Fetch metadata and cover art from several sources
Is there a feature you are looking for? Suggest it
Join us on discord
Android App (beta)
Try it out on the Google Play Store
iOS App (early beta)
Available using Test Flight: https://testflight.apple.com/join/wiic7QIW - Join the discussion

Organizing your audiobooks
Directory structure and folder names are important to Audiobookshelf!
See documentation for supported directory structure, folder naming conventions, and audio file metadata usage.
Installation
** Default username is "root" with no password
Docker Install
Available in Unraid Community Apps
docker pull advplyr/audiobookshelf

docker run -d \
  -e AUDIOBOOKSHELF_UID=99 \
  -e AUDIOBOOKSHELF_GID=100 \
  -p 13378:80 \
  -v </path/to/audiobooks>:/audiobooks \
  -v </path/to/config>:/config \
  -v </path/to/metadata>:/metadata \
  --name audiobookshelf \
  --rm advplyr/audiobookshelf
Running with Docker Compose
### docker-compose.yml ###
services:
  audiobookshelf:
    image: advplyr/audiobookshelf
    ports:
      - 13378:80
    volumes:
      - <path/to/your/audiobooks>:/audiobooks
      - <path/to/metadata>:/metadata
      - <path/to/config>:/config
Linux (amd64) Install
Debian package will use this config file /etc/default/audiobookshelf if exists. The install will create a user and group named audiobookshelf.
Ubuntu Install via PPA
A PPA is hosted on github, add and install:
curl -s --compressed "https://advplyr.github.io/audiobookshelf-ppa/KEY.gpg" | sudo apt-key add -

sudo curl -s --compressed -o /etc/apt/sources.list.d/audiobookshelf.list "https://advplyr.github.io/audiobookshelf-ppa/audiobookshelf.list"

sudo apt update

sudo apt install audiobookshelf
or use a single command
curl -s --compressed "https://advplyr.github.io/audiobookshelf-ppa/KEY.gpg" | sudo apt-key add - && sudo curl -s --compressed -o /etc/apt/sources.list.d/audiobookshelf.list "https://advplyr.github.io/audiobookshelf-ppa/audiobookshelf.list" && sudo apt update && sudo apt install audiobookshelf
Install via debian package
Get the deb file from the github repo.
See instructions
Linux file locations
Project directory: /usr/share/audiobookshelf/
Config file: /etc/default/audiobookshelf
System Service: /lib/systemd/system/audiobookshelf.service
Ffmpeg static build: /usr/lib/audiobookshelf-ffmpeg/
Reverse Proxy Set Up
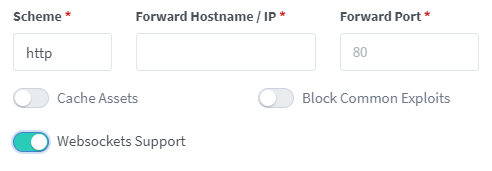
Important! Audiobookshelf requires a websocket connection.
NGINX Proxy Manager
Toggle websockets support.

NGINX Reverse Proxy
Add this to the site config file on your nginx server after you have changed the relevant parts in the <> brackets, and inserted your certificate paths.
server
{
        listen 443 ssl;
        server_name <sub>.<domain>.<tld>;

        access_log /var/log/nginx/audiobookshelf.access.log;
        error_log /var/log/nginx/audiobookshelf.error.log;

        ssl_certificate      /path/to/certificate;
        ssl_certificate_key  /path/to/key;

        location / {
                     proxy_set_header X-Forwarded-For    $proxy_add_x_forwarded_for;
                     proxy_set_header  X-Forwarded-Proto $scheme;
                     proxy_set_header  Host              $host;
                     proxy_set_header Upgrade            $http_upgrade;
                     proxy_set_header Connection         "upgrade";

                     proxy_http_version                  1.1;

                     proxy_pass                          http://<URL_to_forward_to>;
                     proxy_redirect                      http:// https://;
                   }
}
Apache Reverse Proxy
Add this to the site config file on your Apache server after you have changed the relevant parts in the <> brackets, and inserted your certificate paths.
For this to work you must enable at least the following mods using a2enmod:
sslproxy_moduleproxy_wstunnel_modulerewrite_module
<IfModule mod_ssl.c>
<VirtualHost *:443>
    ServerName <sub>.<domain>.<tld>

    ErrorLog ${APACHE_LOG_DIR}/error.log
    CustomLog ${APACHE_LOG_DIR}/access.log combined

    ProxyPreserveHost On
    ProxyPass / http://localhost:<audiobookshelf_port>/
    RewriteEngine on
    RewriteCond %{HTTP:Upgrade} websocket [NC]
    RewriteCond %{HTTP:Connection} upgrade [NC]
    RewriteRule ^/?(.*) "ws://localhost:<audiobookshelf_port>/$1" [P,L]

    # unless you're doing something special this should be generated by a
    # tool like certbot by let's encrypt
    SSLCertificateFile /path/to/cert/file
    SSLCertificateKeyFile /path/to/key/file
</VirtualHost>
</IfModule>
SWAG Reverse Proxy
Synology Reverse Proxy
- Open Control Panel > Application Portal
- Change to the Reverse Proxy tab
- Select the proxy rule for which you want to enable Websockets and click on Edit
- Change to the "Custom Header" tab
- Click Create > WebSocket
- Click Save
