Frigate - Realtime Object Detection for IP Cameras
Uses OpenCV and Tensorflow to perform realtime object detection locally for IP cameras. Designed for integration with HomeAssistant or others via MQTT.
Use of a Google Coral USB Accelerator is optional, but highly recommended. On my Intel i7 processor, I can process 2-3 FPS with the CPU. The Coral can process 100+ FPS with very low CPU load.
- Leverages multiprocessing heavily with an emphasis on realtime over processing every frame
- Uses a very low overhead motion detection to determine where to run object detection
- Object detection with Tensorflow runs in a separate process
- Object info is published over MQTT for integration into HomeAssistant as a binary sensor
- An endpoint is available to view an MJPEG stream for debugging, but should not be used continuously

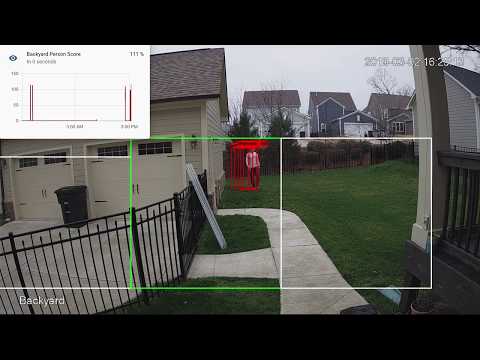
Example video (from older version)
You see multiple bounding boxes because it draws bounding boxes from all frames in the past 1 second where a person was detected. Not all of the bounding boxes were from the current frame.
Getting Started
Run the container with
docker run --rm \
--privileged \
--shm-size=512m \ # should work for a 2-3 cameras
-v /dev/bus/usb:/dev/bus/usb \
-v <path_to_config_dir>:/config:ro \
-v /etc/localtime:/etc/localtime:ro \
-p 5000:5000 \
-e FRIGATE_RTSP_PASSWORD='password' \
blakeblackshear/frigate:stable
Example docker-compose:
  frigate:
    container_name: frigate
    restart: unless-stopped
    privileged: true
    shm_size: '1g' # should work for 5-7 cameras
    image: blakeblackshear/frigate:stable
    volumes:
      - /dev/bus/usb:/dev/bus/usb
      - /etc/localtime:/etc/localtime:ro
      - <path_to_config>:/config
    ports:
      - "5000:5000"
    environment:
      FRIGATE_RTSP_PASSWORD: "password"
A config.yml file must exist in the config directory. See example here and device specific info can be found here.
Integration with HomeAssistant
Setup a the camera, binary_sensor, sensor and optionally automation as shown for each camera you define in frigate. Replace <camera_name> with the camera name as defined in the frigate config.yml (The frigate_coral_fps and frigate_coral_inference sensors only need to be defined once)
camera:
  - name: <camera_name> Last Person
    platform: mqtt
    topic: frigate/<camera_name>/person/snapshot
  - name: <camera_name> Last Car
    platform: mqtt
    topic: frigate/<camera_name>/car/snapshot

binary_sensor:
  - name: <camera_name> Person
    platform: mqtt
    state_topic: "frigate/<camera_name>/person"
    device_class: motion
    availability_topic: "frigate/available"

sensor:
  - platform: rest
    name: Frigate Debug
    resource: http://localhost:5000/debug/stats
    scan_interval: 5
    json_attributes:
      - <camera_name>
      - coral
    value_template: 'OK'
  - platform: template
    sensors:
      <camera_name>_fps:
        value_template: '{{ states.sensor.frigate_debug.attributes["<camera_name>"]["fps"] }}'
        unit_of_measurement: 'FPS'
      <camera_name>_skipped_fps:
        value_template: '{{ states.sensor.frigate_debug.attributes["<camera_name>"]["skipped_fps"] }}'
        unit_of_measurement: 'FPS'
      <camera_name>_detection_fps:
        value_template: '{{ states.sensor.frigate_debug.attributes["<camera_name>"]["detection_fps"] }}'
        unit_of_measurement: 'FPS'
      frigate_coral_fps:
        value_template: '{{ states.sensor.frigate_debug.attributes["coral"]["fps"] }}'
        unit_of_measurement: 'FPS'
      frigate_coral_inference:
        value_template: '{{ states.sensor.frigate_debug.attributes["coral"]["inference_speed"] }}'
        unit_of_measurement: 'ms'

automation:
  - alias: Alert me if a person is detected while armed away
    trigger:
      platform: state
      entity_id: binary_sensor.camera_person
      from: 'off'
      to: 'on'
    condition:
      - condition: state
        entity_id: alarm_control_panel.home_alarm
        state: armed_away
    action:
      - service: notify.user_telegram
        data:
          message: "A person was detected."
          data:
            photo:
              - url: http://<ip>:5000/<camera_name>/person/best.jpg
                caption: A person was detected.
Debuging Endpoint
Access the mjpeg stream at http://localhost:5000/<camera_name> and the best snapshot for any object type with at http://localhost:5000/<camera_name>/<object_name>/best.jpg
You can access a higher resolution mjpeg stream by appending h=height-in-pixels to the endpoint. For example http://localhost:5000/back?h=1080. You can also increase the FPS by appending fps=frame-rate to the URL such as http://localhost:5000/back?fps=10
Keep in mind the MJPEG endpoint is for debugging only, but should not be used continuously as it will put additional load on the system.
Debug info is available at http://localhost:5000/debug/stats
Using a custom model
Models for both CPU and EdgeTPU (Coral) are bundled in the image. You can use your own models with volume mounts:
- CPU Model:
/cpu_model.tflite - EdgeTPU Model:
/edgetpu_model.tflite - Labels:
/labelmap.txt
Tips
- Lower the framerate of the video feed on the camera to reduce the CPU usage for capturing the feed. Not as effective, but you can also modify the
take_frameconfiguration for each camera to only analyze every other frame, or every third frame, etc. - Hard code the resolution of each camera in your config if you are having difficulty starting frigate or if the initial ffprobe for camerea resolution fails or returns incorrect info. Example:
cameras:
  back:
    ffmpeg:
      input: rtsp://<camera>
    height: 1080
    width: 1920
- Object configuration - Tracked objects types, sizes and thresholds can be defined globally and/or on a per camera basis. The global and camera object configuration is merged. For example, if you defined tracking person, car, and truck globally but modified your backyard camera to only track person, the global config would merge making the effective list for the backyard camera still contain person, car and truck. If you want precise object tracking per camera, best practice to put a minimal list of objects at the global level and expand objects on a per camera basis. Object threshold and area configuration will be used first from the camera object config (if defined) and then from the global config. See the example config for more information.
- Masks and limiting detection to a certain area - You can create a bitmap (bmp) file the same aspect ratio as your camera feed to limit detection to certain areas. The mask works by looking at the bottom center of any bounding box (red dot below) and comparing that to your mask.

If that red dot falls on an area of your mask that is black, the detection (and motion) will be ignored. Here is a sample mask that would limit detection to only the front yard and not the street for the above image:
