mirror of
https://github.com/Unleash/unleash.git
synced 2024-10-18 20:09:08 +02:00
## What The main purpose of this PR is to 1. Delete the proxy docs in this repo and replace them with the proxy's GitHub readme. 2. Add the docs for Unleash Edge. ### Detailed change description This PR contains a lot of small changes in a large number of files. To make it easier to get an overview, here's a detailed description of what happens where: #### In the `website/docs`directory Except for the deletion of the proxy doc, all changes in this directory are rewriting internal links, so that they point to the newly generated document instead. #### `package.json` and `yarn.lock` When including the documentation for Edge, we also want to render the mermaid diagrams it uses. Docusaurus supports this via a plugin. All changes in these files are related to installing that plugin. #### `docusaurus.config.js` There's two types of changes in this file: 1. Mermaid-related changes: we ask docusaurus to render mermaid in markdown files and add the plugin 2. Document generation. There's some rewrites to the sdk doc generation plus an entirely new section that generates docs for Edge and the proxy #### `sidebars.js` Two things: 1. Add the edge docs 2. Move both the Edge and the proxy docs up a level, so that they're directly under "reference docs" instead of nested inside "unleash concepts". #### In the `website/remote-content` directory These are the remote content files. Previously, all of this lived only in a `readme-fns.js` file, but with the introduction of Edge and proxy docs, this has been moved into its own directory and refactored into three files (`shared`, `sdks`, `edge-proxy`). #### `custom.css` Style updates to center mermaid diagrams and provide more space around them. #### In `static/img` The image files that were included in the proxy doc and that have been deleted. ## Why For two reasons: 1. Reduce duplication for the proxy. Have one source of truth. 2. Add docs for edge. ## Discussion points and review wishes This is a big PR, and I don't expect anyone to do a line-by-line review of it, nor do I think that is particularly useful. Instead, I'd like to ask reviewers to: 1. Visit the [documentation preview](https://unleash-docs-git-docs-source-proxy-gh-unleash-team.vercel.app/reference/unleash-proxy) and have a look at both the proxy docs and the Edge docs. Potentially have a look at the SDK docs too to verify that everything still works. 2. Consider whether they think moving the proxy and edge docs up a level (in the sidebar) makes sense. 3. Let me know what slug they'd prefer for the Edge docs. I've gone with `unleash-edge` for now (so that it's `docs.getunleash.io/reference/unleash-edge`), but we could potentially also just use `edge`. WDYT? 4. Read through the detailed changes section. 5. Let me know if they have any other concerns or questions. ## Screenies The new proxy doc: 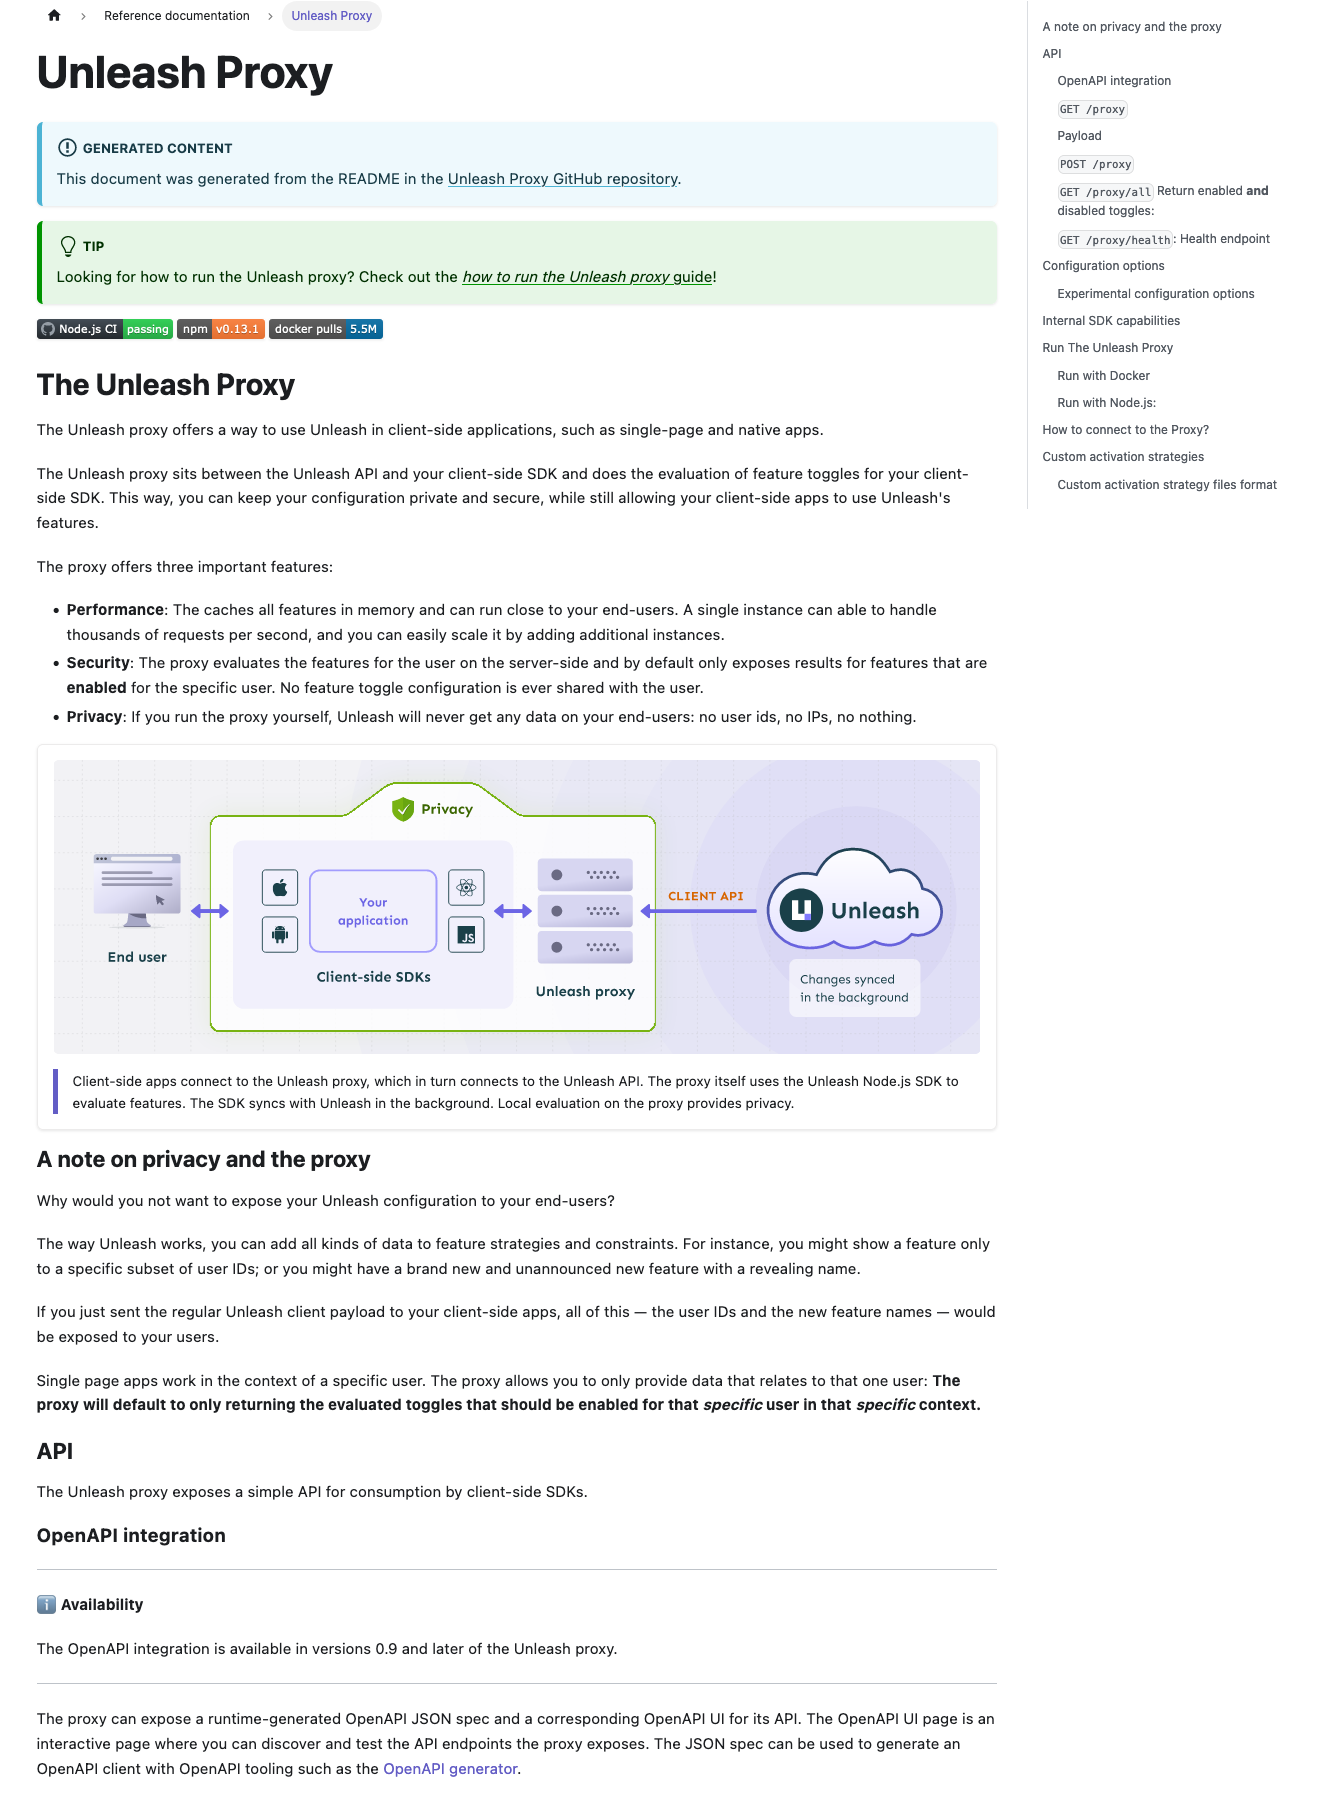 The new edge doc: 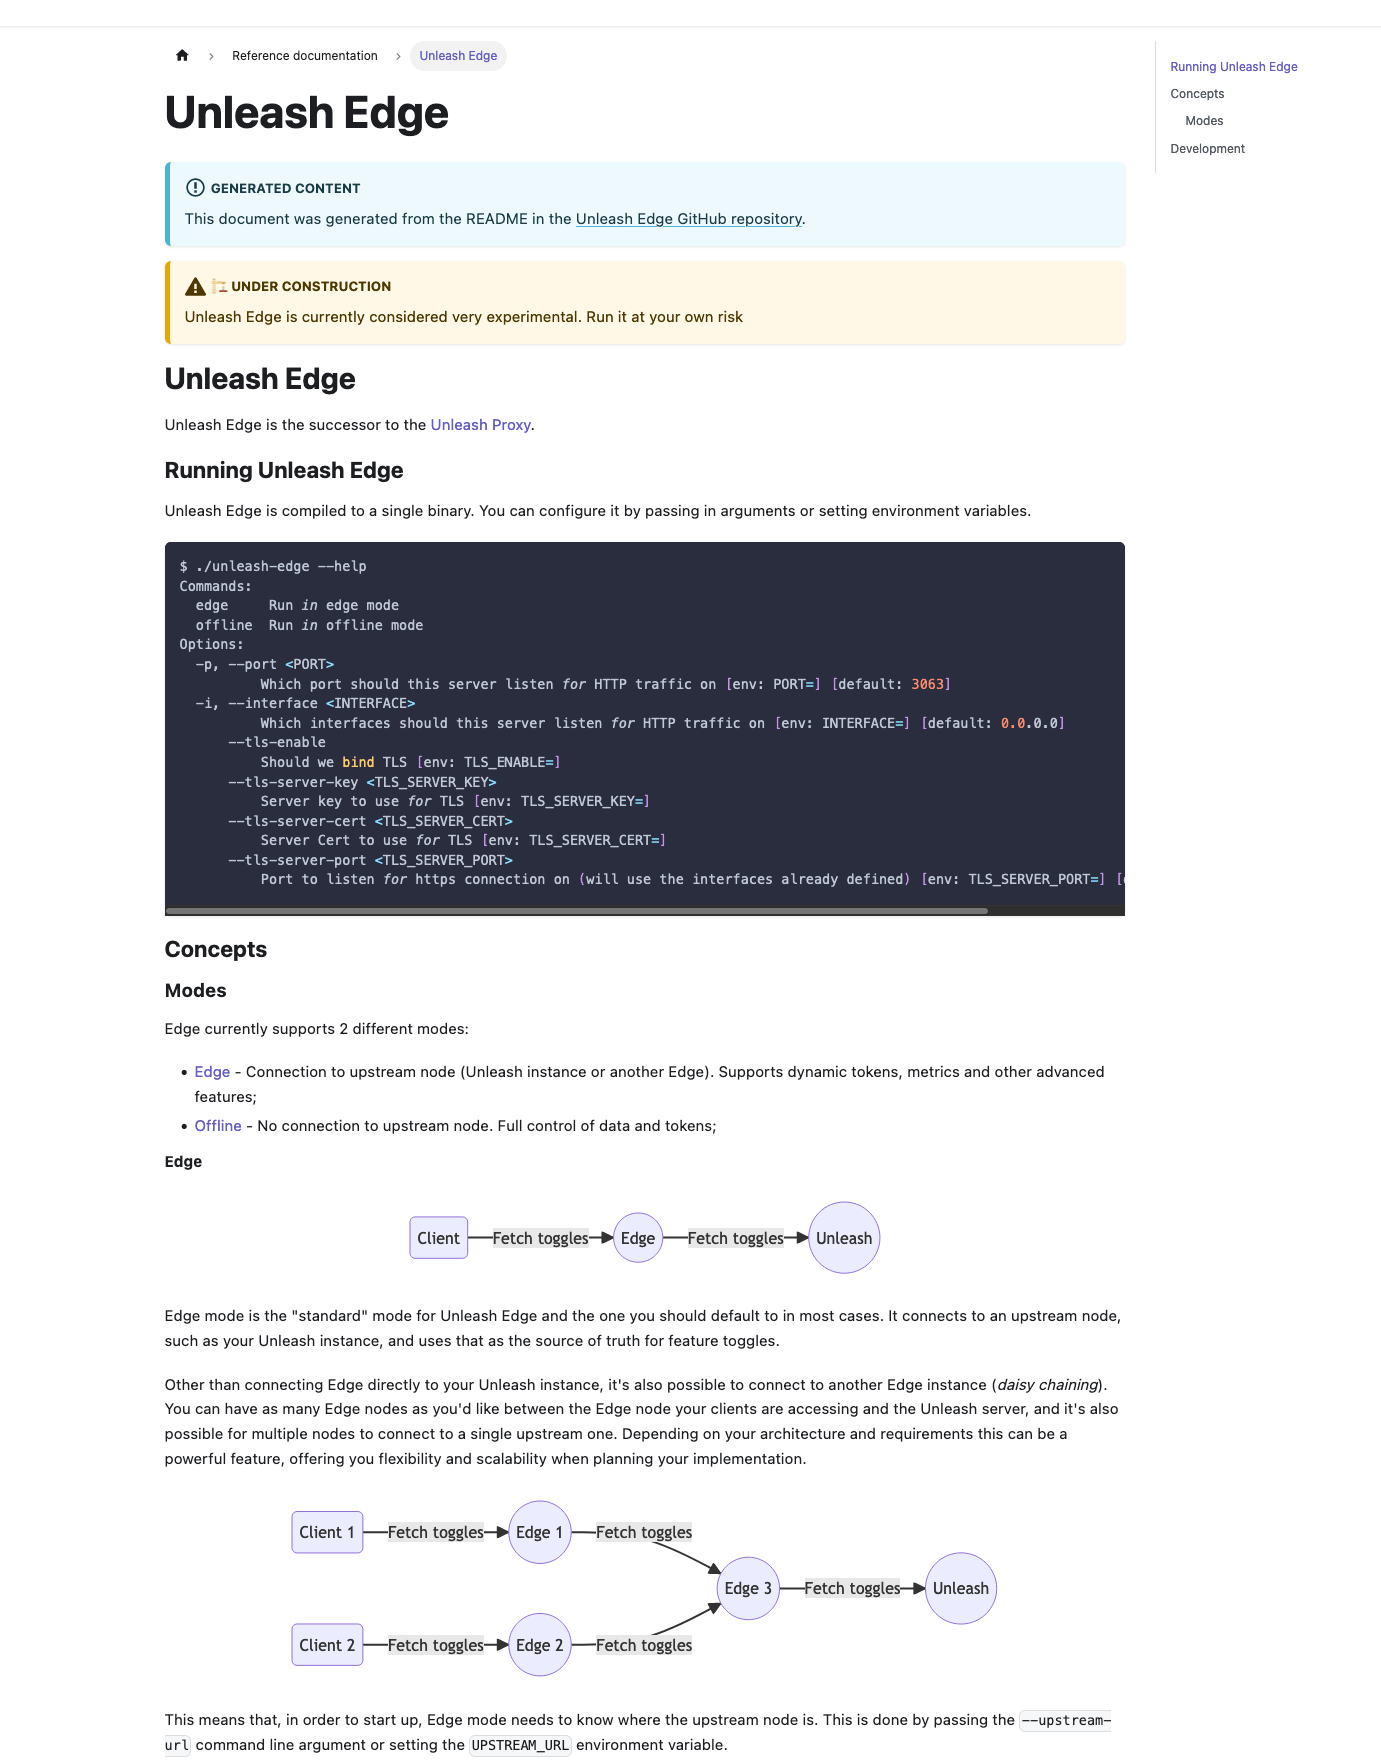
113 lines
4.3 KiB
Plaintext
113 lines
4.3 KiB
Plaintext
---
|
|
title: How to run the Unleash Proxy
|
|
---
|
|
|
|
import ApiRequest from '@site/src/components/ApiRequest'
|
|
|
|
:::info Placeholders
|
|
|
|
Placeholders in the code samples below are delimited by angle brackets (i.e. `<placeholder-name>`). You will need to replace them with the values that are correct in _your_ situation for the code samples to run properly.
|
|
|
|
:::
|
|
|
|
The [Unleash Proxy](../generated/unleash-proxy.md) provides a way for you to consume feature toggles in [front-end clients](../reference/sdks/index.md#front-end-sdks), such as the [JavaScript Proxy client](/docs/generated/sdks/client-side/javascript-browser.md) and [React Proxy client](/docs/generated/sdks/client-side/react.md).
|
|
|
|
Depending on your setup, the Proxy is most easily run in one of two ways, depending on your situation:
|
|
|
|
- [Via Docker](#run-proxy-via-docker)
|
|
- [As a Node.js app](#run-proxy-as-node-app)
|
|
|
|
If you're using a hosted version of Unleash, we can also run the proxy for you.
|
|
|
|
## Prerequisites
|
|
|
|
This is what you need before you can run the proxy:
|
|
|
|
- A running Unleash server to connect to. You'll need its API path (e.g. `https://app.unleash-hosted.com/demo/api`) to connect the proxy to it.
|
|
- A [client API token](../reference/api-tokens-and-client-keys#client-tokens) for the proxy to use.
|
|
- If you're running the Proxy via Docker: [the `docker` command line tool](https://www.docker.com/).
|
|
- If you're running the Proxy as a Node.js app: [Node.js and its command line tools](https://nodejs.org/).
|
|
- A [Proxy client key](../reference/api-tokens-and-client-keys#proxy-client-keys). This can be any arbitrary string (for instance: `proxy-client-key`). Use this key when connecting a client SDK to the Proxy.
|
|
|
|
## How to run the Proxy via Docker {#run-proxy-via-docker}
|
|
|
|
We provide a [Docker image (available on on Docker Hub)](https://hub.docker.com/r/unleashorg/unleash-proxy) that you can use to run the proxy.
|
|
|
|
### 1. Pull the Proxy image
|
|
|
|
Use the `docker` command to pull the Proxy image:
|
|
|
|
```bash title="Pull the Unleash Proxy docker image"
|
|
docker pull unleashorg/unleash-proxy
|
|
```
|
|
|
|
### 2. Start the Proxy
|
|
|
|
When running the Proxy, you'll need to provide it with at least the configuration options listed below. Check the reference docs for the [full list of configuration options](../generated/unleash-proxy.md#configuration-options).
|
|
|
|
```bash title="Run the Unleash Proxy via Docker"
|
|
docker run \
|
|
-e UNLEASH_PROXY_CLIENT_KEYS=<proxy-client-key> \
|
|
-e UNLEASH_URL='<unleash-api-url>' \
|
|
-e UNLEASH_API_TOKEN=<client-api-token> \
|
|
-p 3000:3000 \
|
|
unleashorg/unleash-proxy
|
|
```
|
|
|
|
If the proxy starts up successfully, you should see the following output:
|
|
|
|
```bash
|
|
Unleash-proxy is listening on port 3000!
|
|
```
|
|
|
|
## How to run the Proxy as a Node.js app {#run-proxy-as-node-app}
|
|
|
|
To run the Proxy via Node.js, you'll have to create your own Node.js project and use the Unleash Proxy as a dependency.
|
|
|
|
### 1. initialize the project
|
|
|
|
If you don't already have an existing Node.js project, create one:
|
|
|
|
```bash npm2yarn
|
|
npm init
|
|
```
|
|
|
|
### 2. Install the Unleash Proxy package
|
|
|
|
Install the Unleash Proxy as a dependency:
|
|
|
|
```shell npm2yarn
|
|
npm install @unleash/proxy
|
|
```
|
|
|
|
### 3. Configure and start the proxy
|
|
|
|
Import the `createApp` function from `@unleash/proxy` and configure the proxy. You'll need to provide at least the configuration options highlighted below. Check the reference docs for the [full list of configuration options](../generated/unleash-proxy.md#configuration-options).
|
|
|
|
Here is an example of what running the Proxy as a Node.js app might look like:
|
|
|
|
```js title="Sample app running the Unleash Proxy"
|
|
const port = 3000;
|
|
|
|
const { createApp } = require('@unleash/proxy');
|
|
|
|
const app = createApp({
|
|
// highlight-start
|
|
unleashUrl: '<unleash-api-url>',
|
|
unleashApiToken: '<client-api-token>',
|
|
clientKeys: ['<proxy-client-key>'],
|
|
proxyPort: 3000,
|
|
// highlight-end
|
|
});
|
|
|
|
app.listen(port, () =>
|
|
console.log(`Unleash Proxy listening on http://localhost:${port}/proxy`),
|
|
);
|
|
```
|
|
|
|
## Verify that the proxy is working
|
|
|
|
When the proxy process has started up correctly, you can start querying its `/proxy` endpoint. If it's running correctly, you'll get back a JSON object with a list of toggles. The list may be empty if you haven't added any toggles for the corresponding project/environment yet.
|
|
|
|
<ApiRequest verb="get" url="proxy" endpointType="proxy" title="Request toggles from the Unleash Proxy"/>
|