mirror of
https://github.com/blakeblackshear/frigate.git
synced 2026-01-05 20:04:51 +01:00
* Included caution about Snapcraft docker issues.

* Accepted format suggestion from NickM-27

Co-authored-by: Nicolas Mowen <nickmowen213@gmail.com>

---------

Co-authored-by: Nicolas Mowen <nickmowen213@gmail.com>
313 lines
16 KiB
Markdown
313 lines
16 KiB
Markdown
---
|
|
id: installation
|
|
title: Installation
|
|
---
|
|
|
|
Frigate is a Docker container that can be run on any Docker host including as a [HassOS Addon](https://www.home-assistant.io/addons/). Note that a Home Assistant Addon is **not** the same thing as the integration. The [integration](/integrations/home-assistant) is required to integrate Frigate into Home Assistant.
|
|
|
|
## Dependencies
|
|
|
|
**MQTT broker (optional)** - An MQTT broker is optional with Frigate, but is required for the Home Assistant integration. If using Home Assistant, Frigate and Home Assistant must be connected to the same MQTT broker.
|
|
|
|
## Preparing your hardware
|
|
|
|
### Operating System
|
|
|
|
Frigate runs best with docker installed on bare metal debian-based distributions. For ideal performance, Frigate needs access to underlying hardware for the Coral and GPU devices. Running Frigate in a VM on top of Proxmox, ESXi, Virtualbox, etc. is not recommended. The virtualization layer often introduces a sizable amount of overhead for communication with Coral devices, but [not in all circumstances](https://github.com/blakeblackshear/frigate/discussions/1837).
|
|
|
|
Windows is not officially supported, but some users have had success getting it to run under WSL or Virtualbox. Getting the GPU and/or Coral devices properly passed to Frigate may be difficult or impossible. Search previous discussions or issues for help.
|
|
|
|
### Storage
|
|
|
|
Frigate uses the following locations for read/write operations in the container. Docker volume mappings can be used to map these to any location on your host machine.
|
|
|
|
- `/config`: Used to store the Frigate config file and sqlite database. You will also see a few files alongside the database file while Frigate is running.
|
|
- `/media/frigate/clips`: Used for snapshot storage. In the future, it will likely be renamed from `clips` to `snapshots`. The file structure here cannot be modified and isn't intended to be browsed or managed manually.
|
|
- `/media/frigate/recordings`: Internal system storage for recording segments. The file structure here cannot be modified and isn't intended to be browsed or managed manually.
|
|
- `/media/frigate/exports`: Storage for clips and timelapses that have been exported via the WebUI or API.
|
|
- `/tmp/cache`: Cache location for recording segments. Initial recordings are written here before being checked and converted to mp4 and moved to the recordings folder. Segments generated via the `clip.mp4` endpoints are also concatenated and processed here. It is recommended to use a [`tmpfs`](https://docs.docker.com/storage/tmpfs/) mount for this.
|
|
- `/dev/shm`: Internal cache for raw decoded frames in shared memory. It is not recommended to modify this directory or map it with docker. The minimum size is impacted by the `shm-size` calculations below.
|
|
|
|
#### Common docker compose storage configurations
|
|
|
|
Writing to a local disk or external USB drive:
|
|
|
|
```yaml
|
|
version: "3.9"
|
|
services:
|
|
frigate:
|
|
...
|
|
volumes:
|
|
- /path/to/your/config:/config
|
|
- /path/to/your/storage:/media/frigate
|
|
- type: tmpfs # Optional: 1GB of memory, reduces SSD/SD Card wear
|
|
target: /tmp/cache
|
|
tmpfs:
|
|
size: 1000000000
|
|
...
|
|
```
|
|
|
|
:::caution
|
|
|
|
Users of the Snapcraft build of Docker cannot use storage locations outside your $HOME folder.
|
|
|
|
:::
|
|
|
|
### Calculating required shm-size
|
|
|
|
Frigate utilizes shared memory to store frames during processing. The default `shm-size` provided by Docker is **64MB**.
|
|
|
|
The default shm size of **64MB** is fine for setups with **2 cameras** detecting at **720p**. If Frigate is exiting with "Bus error" messages, it is likely because you have too many high resolution cameras and you need to specify a higher shm size, using [`--shm-size`](https://docs.docker.com/engine/reference/run/#runtime-constraints-on-resources) (or [`service.shm_size`](https://docs.docker.com/compose/compose-file/compose-file-v2/#shm_size) in docker-compose).
|
|
|
|
The Frigate container also stores logs in shm, which can take up to **30MB**, so make sure to take this into account in your math as well.
|
|
|
|
You can calculate the necessary shm size for each camera with the following formula using the resolution specified for detect:
|
|
|
|
```console
|
|
# Replace <width> and <height>
|
|
$ python -c 'print("{:.2f}MB".format((<width> * <height> * 1.5 * 9 + 270480) / 1048576))'
|
|
|
|
# Example for 1280x720
|
|
$ python -c 'print("{:.2f}MB".format((1280 * 720 * 1.5 * 9 + 270480) / 1048576))'
|
|
12.12MB
|
|
|
|
# Example for eight cameras detecting at 1280x720, including logs
|
|
$ python -c 'print("{:.2f}MB".format(((1280 * 720 * 1.5 * 9 + 270480) / 1048576) * 8 + 30))'
|
|
126.99MB
|
|
```
|
|
|
|
The shm size cannot be set per container for Home Assistant add-ons. However, this is probably not required since by default Home Assistant Supervisor allocates `/dev/shm` with half the size of your total memory. If your machine has 8GB of memory, chances are that Frigate will have access to up to 4GB without any additional configuration.
|
|
|
|
### Raspberry Pi 3/4
|
|
|
|
By default, the Raspberry Pi limits the amount of memory available to the GPU. In order to use ffmpeg hardware acceleration, you must increase the available memory by setting `gpu_mem` to the maximum recommended value in `config.txt` as described in the [official docs](https://www.raspberrypi.org/documentation/computers/config_txt.html#memory-options).
|
|
|
|
Additionally, the USB Coral draws a considerable amount of power. If using any other USB devices such as an SSD, you will experience instability due to the Pi not providing enough power to USB devices. You will need to purchase an external USB hub with it's own power supply. Some have reported success with <a href="https://amzn.to/3a2mH0P" target="_blank" rel="nofollow noopener sponsored">this</a> (affiliate link).
|
|
|
|
## Docker
|
|
|
|
Running in Docker with compose is the recommended install method.
|
|
|
|
```yaml
|
|
version: "3.9"
|
|
services:
|
|
frigate:
|
|
container_name: frigate
|
|
privileged: true # this may not be necessary for all setups
|
|
restart: unless-stopped
|
|
image: ghcr.io/blakeblackshear/frigate:stable
|
|
shm_size: "64mb" # update for your cameras based on calculation above
|
|
devices:
|
|
- /dev/bus/usb:/dev/bus/usb # passes the USB Coral, needs to be modified for other versions
|
|
- /dev/apex_0:/dev/apex_0 # passes a PCIe Coral, follow driver instructions here https://coral.ai/docs/m2/get-started/#2a-on-linux
|
|
- /dev/dri/renderD128 # for intel hwaccel, needs to be updated for your hardware
|
|
volumes:
|
|
- /etc/localtime:/etc/localtime:ro
|
|
- /path/to/your/config:/config
|
|
- /path/to/your/storage:/media/frigate
|
|
- type: tmpfs # Optional: 1GB of memory, reduces SSD/SD Card wear
|
|
target: /tmp/cache
|
|
tmpfs:
|
|
size: 1000000000
|
|
ports:
|
|
- "5000:5000"
|
|
- "8554:8554" # RTSP feeds
|
|
- "8555:8555/tcp" # WebRTC over tcp
|
|
- "8555:8555/udp" # WebRTC over udp
|
|
environment:
|
|
FRIGATE_RTSP_PASSWORD: "password"
|
|
```
|
|
|
|
If you can't use docker compose, you can run the container with something similar to this:
|
|
|
|
```bash
|
|
docker run -d \
|
|
--name frigate \
|
|
--restart=unless-stopped \
|
|
--mount type=tmpfs,target=/tmp/cache,tmpfs-size=1000000000 \
|
|
--device /dev/bus/usb:/dev/bus/usb \
|
|
--device /dev/dri/renderD128 \
|
|
--shm-size=64m \
|
|
-v /path/to/your/storage:/media/frigate \
|
|
-v /path/to/your/config:/config \
|
|
-v /etc/localtime:/etc/localtime:ro \
|
|
-e FRIGATE_RTSP_PASSWORD='password' \
|
|
-p 5000:5000 \
|
|
-p 8554:8554 \
|
|
-p 8555:8555/tcp \
|
|
-p 8555:8555/udp \
|
|
ghcr.io/blakeblackshear/frigate:stable
|
|
```
|
|
|
|
The official docker image tags for the current stable version are:
|
|
|
|
- `stable` - Standard Frigate build for amd64 & RPi Optimized Frigate build for arm64
|
|
- `stable-standard-arm64` - Standard Frigate build for arm64
|
|
- `stable-tensorrt` - Frigate build specific for amd64 devices running an nvidia GPU
|
|
|
|
The community supported docker image tags for the current stable version are:
|
|
|
|
- `stable-tensorrt-jp5` - Frigate build optimized for nvidia Jetson devices running Jetpack 5
|
|
- `stable-tensorrt-jp4` - Frigate build optimized for nvidia Jetson devices running Jetpack 4.6
|
|
- `stable-rk` - Frigate build for SBCs with Rockchip SoC
|
|
|
|
## Home Assistant Addon
|
|
|
|
:::caution
|
|
|
|
As of HomeAssistant OS 10.2 and Core 2023.6 defining separate network storage for media is supported.
|
|
|
|
There are important limitations in Home Assistant Operating System to be aware of:
|
|
|
|
- Separate local storage for media is not yet supported by Home Assistant
|
|
- AMD GPUs are not supported because HA OS does not include the mesa driver.
|
|
- Nvidia GPUs are not supported because addons do not support the nvidia runtime.
|
|
|
|
:::
|
|
|
|
:::tip
|
|
|
|
See [the network storage guide](/guides/ha_network_storage.md) for instructions to setup network storage for frigate.
|
|
|
|
:::
|
|
|
|
HassOS users can install via the addon repository.
|
|
|
|
1. Navigate to Supervisor > Add-on Store > Repositories
|
|
2. Add https://github.com/blakeblackshear/frigate-hass-addons
|
|
3. Install your desired Frigate NVR Addon and navigate to it's page
|
|
4. Setup your network configuration in the `Configuration` tab
|
|
5. (not for proxy addon) Create the file `frigate.yaml` in your `config` directory with your detailed Frigate configuration
|
|
6. Start the addon container
|
|
7. (not for proxy addon) If you are using hardware acceleration for ffmpeg, you may need to disable "Protection mode"
|
|
|
|
There are several versions of the addon available:
|
|
|
|
| Addon Version | Description |
|
|
| ------------------------------ | ---------------------------------------------------------- |
|
|
| Frigate NVR | Current release with protection mode on |
|
|
| Frigate NVR (Full Access) | Current release with the option to disable protection mode |
|
|
| Frigate NVR Beta | Beta release with protection mode on |
|
|
| Frigate NVR Beta (Full Access) | Beta release with the option to disable protection mode |
|
|
|
|
## Kubernetes
|
|
|
|
Use the [helm chart](https://github.com/blakeblackshear/blakeshome-charts/tree/master/charts/frigate).
|
|
|
|
## Unraid
|
|
|
|
Many people have powerful enough NAS devices or home servers to also run docker. There is a Unraid Community App.
|
|
To install make sure you have the [community app plugin here](https://forums.unraid.net/topic/38582-plug-in-community-applications/). Then search for "Frigate" in the apps section within Unraid - you can see the online store [here](https://unraid.net/community/apps?q=frigate#r)
|
|
|
|
## Proxmox
|
|
|
|
It is recommended to run Frigate in LXC for maximum performance. See [this discussion](https://github.com/blakeblackshear/frigate/discussions/1111) for more information.
|
|
|
|
## ESXi
|
|
|
|
For details on running Frigate using ESXi, please see the instructions [here](https://williamlam.com/2023/05/frigate-nvr-with-coral-tpu-igpu-passthrough-using-esxi-on-intel-nuc.html).
|
|
|
|
If you're running Frigate on a rack mounted server and want to passthough the Google Coral, [read this.](https://github.com/blakeblackshear/frigate/issues/305)
|
|
|
|
## Synology NAS on DSM 7
|
|
|
|
These settings were tested on DSM 7.1.1-42962 Update 4
|
|
|
|
**General:**
|
|
|
|
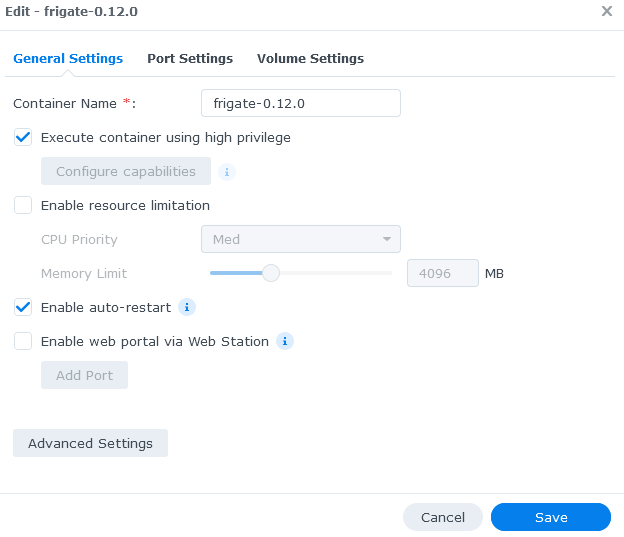
The `Execute container using high privilege` option needs to be enabled in order to give the frigate container the elevated privileges it may need.
|
|
|
|
The `Enable auto-restart` option can be enabled if you want the container to automatically restart whenever it improperly shuts down due to an error.
|
|
|
|
|
|
|
|
**Advanced Settings:**
|
|
|
|
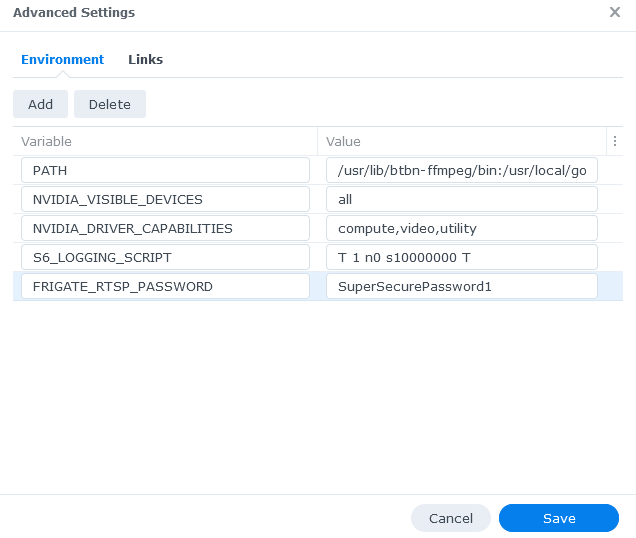
If you want to use the password template feature, you should add the "FRIGATE_RTSP_PASSWORD" environment variable and set it to your preferred password under advanced settings. The rest of the environment variables should be left as default for now.
|
|
|
|
|
|
|
|
**Port Settings:**
|
|
|
|
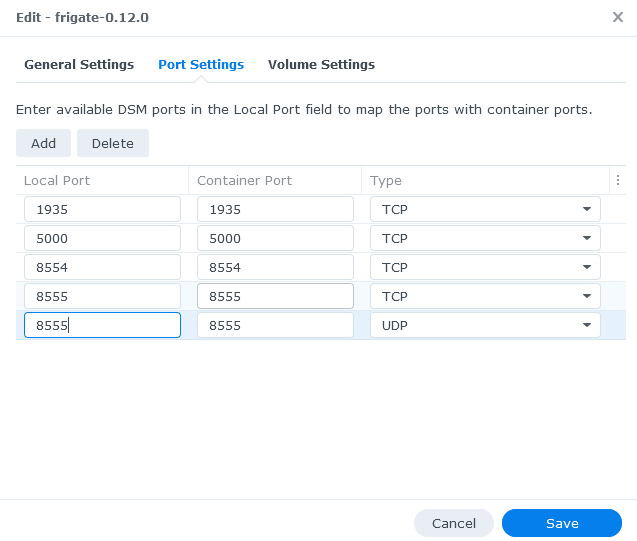
The network mode should be set to `bridge`. You need to map the default frigate container ports to your local Synology NAS ports that you want to use to access Frigate.
|
|
|
|
There may be other services running on your NAS that are using the same ports that frigate uses. In that instance you can set the ports to auto or a specific port.
|
|
|
|
|
|
|
|
**Volume Settings:**
|
|
|
|
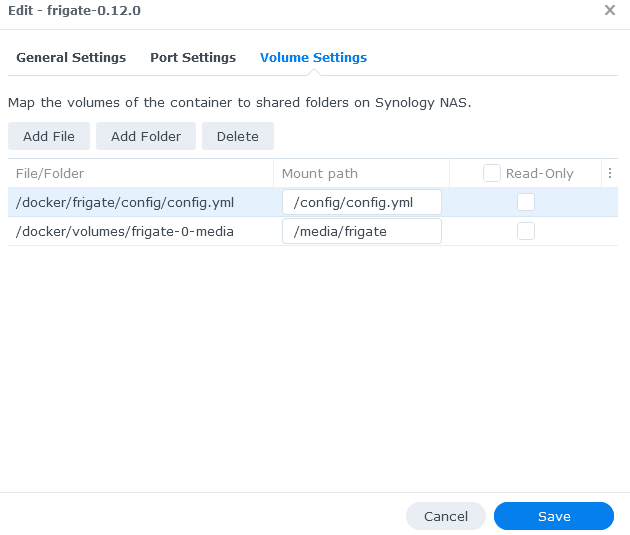
You need to configure 2 paths:
|
|
|
|
- The location of your config file in yaml format, this needs to be file and you need to go to the location of where your config.yml is located, this will be different depending on your NAS folder structure e.g. `/docker/frigate/config/config.yml` will mount to `/config/config.yml` within the container.
|
|
- The location on your NAS where the recordings will be saved this needs to be a folder e.g. `/docker/volumes/frigate-0-media`
|
|
|
|
|
|
|
|
## QNAP NAS
|
|
|
|
These instructions were tested on a QNAP with an Intel J3455 CPU and 16G RAM, running QTS 4.5.4.2117.
|
|
|
|
QNAP has a graphic tool named Container Station to install and manage docker containers. However, there are two limitations with Container Station that make it unsuitable to install Frigate:
|
|
|
|
1. Container Station does not incorporate GitHub Container Registry (ghcr), which hosts Frigate docker image version 0.12.0 and above.
|
|
2. Container Station uses default 64 Mb shared memory size (shm-size), and does not have a mechanism to adjust it. Frigate requires a larger shm-size to be able to work properly with more than two high resolution cameras.
|
|
|
|
Because of above limitations, the installation has to be done from command line. Here are the steps:
|
|
|
|
**Preparation**
|
|
|
|
1. Install Container Station from QNAP App Center if it is not installed.
|
|
2. Enable ssh on your QNAP (please do an Internet search on how to do this).
|
|
3. Prepare Frigate config file, name it `config.yml`.
|
|
4. Calculate shared memory size according to [documentation](https://docs.frigate.video/frigate/installation).
|
|
5. Find your time zone value from https://en.wikipedia.org/wiki/List_of_tz_database_time_zones
|
|
6. ssh to QNAP.
|
|
|
|
**Installation**
|
|
|
|
Run the following commands to install Frigate (using `stable` version as example):
|
|
|
|
```shell
|
|
# Download Frigate image
|
|
docker pull ghcr.io/blakeblackshear/frigate:stable
|
|
# Create directory to host Frigate config file on QNAP file system.
|
|
# E.g., you can choose to create it under /share/Container.
|
|
mkdir -p /share/Container/frigate/config
|
|
# Copy the config file prepared in step 2 into the newly created config directory.
|
|
cp path/to/your/config/file /share/Container/frigate/config
|
|
# Create directory to host Frigate media files on QNAP file system.
|
|
# (if you have a surveilliance disk, create media directory on the surveilliance disk.
|
|
# Example command assumes share_vol2 is the surveilliance drive
|
|
mkdir -p /share/share_vol2/frigate/media
|
|
# Create Frigate docker container. Replace shm-size value with the value from preparation step 3.
|
|
# Also replace the time zone value for 'TZ' in the sample command.
|
|
# Example command will create a docker container that uses at most 2 CPUs and 4G RAM.
|
|
# You may need to add "--env=LIBVA_DRIVER_NAME=i965 \" to the following docker run command if you
|
|
# have certain CPU (e.g., J4125). See https://docs.frigate.video/configuration/hardware_acceleration.
|
|
docker run \
|
|
--name=frigate \
|
|
--shm-size=256m \
|
|
--restart=unless-stopped \
|
|
--env=TZ=America/New_York \
|
|
--volume=/share/Container/frigate/config:/config:rw \
|
|
--volume=/share/share_vol2/frigate/media:/media/frigate:rw \
|
|
--network=bridge \
|
|
--privileged \
|
|
--workdir=/opt/frigate \
|
|
-p 1935:1935 \
|
|
-p 5000:5000 \
|
|
-p 8554:8554 \
|
|
-p 8555:8555 \
|
|
-p 8555:8555/udp \
|
|
--label='com.qnap.qcs.network.mode=nat' \
|
|
--label='com.qnap.qcs.gpu=False' \
|
|
--memory="4g" \
|
|
--cpus="2" \
|
|
--detach=true \
|
|
-t \
|
|
ghcr.io/blakeblackshear/frigate:stable
|
|
```
|
|
|
|
Log into QNAP, open Container Station. Frigate docker container should be listed under 'Overview' and running. Visit Frigate Web UI by clicking Frigate docker, and then clicking the URL shown at the top of the detail page.
|